

This post contains affiliate links. When you purchase through links on our site, we may earn an affiliate commission. Learn more about it here.
If you’re here, you’re probably looking for a cheaper alternative blade for your cutting machine.
If you’ve been using your machine for quite some time, you’ll realize how fast the blades get dull especially if you cut a lot of paper or cardstock and how expensive it could get to replace them in the long run.
When you buy a new cutting machine, be it the Silhouette Cameo 3 or Cameo 4, they’ll include the standard AutoBlade in the box so you could use your machine right away.
I mean the AutoBlade is not bad at all, so why would you want to get the CB09 blade?
Table of Contents
What is a CB09 blade?
CB09 blade is a carbide cutting blade that is used together with the aluminum alloy blade holder. Unlike the AutoBlade, CB09 blades are replaceable. So you don’t need to buy a new set of blade holder every time the blade gets dull. Just buy a new blade and replace the old one.

While the CB09 blade holder cost almost the same as the new set of Cameo AutoBlade, the CB09 blades themselves are super cheap. This means that it will save you a lot of money if you plan to use your machine routinely!
And the best part is, you get a cleaner cut with a CB09 blade than you would with a standard blade. That will surely come in handy if you plan to cut very intricate designs.
The durability of the CB09 blade is as good as, if not better, than that of the standard ones.
The disadvantage of CB09 blades
As good as the blade sounds, it does come with a caveat. CB09 blade holders aren’t made specifically for your machine; it’s supposed to be a universal holder that can used for different types of cutting machine, like the Silhouette Cameo, Silhouette Portrait or even the Brother Scan N Cut! So you kinda need an adapter for it. Without an adapter, you couldn’t install it on your machine.

The Cameo 4 for an example comes with 4 different adapters. If you’re lucky, the blade holder can fit in any one of those adapters (in most cases, the blue one). But you can’t know that for certain. Since there’s always going to be a certain margin of manufacturing error, the size may vary. A tad bit bigger, and the blade won’t fit in the adapter anymore.
Unlike the Cameo 4 AutoBlade, you can’t adjust the blade depth (or how much the blade protrudes) automatically using the cutting machine software. You need to adjust the blade depth manually by turning the knob clockwise or counterclockwise.
The thing is, the blade has no indicators printed or etched on it whatsoever. So there’s no way to know how much you should turn the knob to adjust the blade depth.
There’s a workaround for that though, and it requires a little bit of effort and patience. Learn how do to it in the later section of this post.
What type of CB09 blades and blade holders are there?
CB09 Blade holder
There are two types of CB09 blade holders. The newer models come with a base that has a spring-loaded sleeve, so you don’t need any spring when you install the blade.

The older models on the other hand, don’t have a pre-installed spring in the base. So when installing a new blade, you need to insert a compatible spring in the holder in order for it to work.
The springs are usually always included when you buy the replacement blades
So spare yourself the trouble and just get the newer model.

CB09 Blade
So now let’s talk about the blade types. There are 3 types of CB09 blades that you can get. There are blades with a blue cap, a red cap, and a yellow cap. So how do they differ from each other?
If you take a close look at the blades, you’ll notice that the tips are angled. Each one is angled differently. This also means that each one can only cut materials of up to certain thickness.
A 60° blade has the least dragging force due to the less blade surface touching the material during cutting. So vinyl ears, which is where the vinyl lifts up, is less likely to occur. That makes 60°-blades perfect for cutting intricate designs.
The most common and popular blade is the 45° blade. In fact, the tip of the Cameo AutoBlade blade is angled at a 45° angle. You probably wouldn’t need the other ones, since the 45° blade can cut pretty much everything if it’s not out of the ordinary.
But if you’re interested to get different ones, here’s an overview of the materials that can be cut using different types of CB09 blades.

If you don’t want to keep switching the blades whenever you wanna cut different materials, I suggest investing in several CB09 blade holders. You would be spending more money on the blade holders, but it might be a smart investment to make, considering how cheap the blades are.
How to install the blade into the blade holder
Step 1: Unscrew the base
First, unscrew the black base to reveal the blade sleeve. My blade holder model has a spring-loaded sleeve in the base so if yours is like mine, it would look something like this:

Step 2: Remove the blade cap
Next, take your CB09 blade and remove its cap. The cap protects the sharp tip of the blade, so please be careful when you remove it.
Step 3: Inserting blade into sleeve
Now hold your blade where the sharp tip is pointing down and insert it into the sleeve carefully. You don’t need to force it down if it doesn’t get in right away, just wiggle it a bit and push it lightly until it falls through.
If you have an older model, you will need to slide the spring over the blade.
Step 4: Screw the base back on
Finally, the screw the base back on! Do it carefully and make sure to not touch the opening in the base of the holder.
You don’t want the blade to protrude like this, so let’s screw in the blade by turning the knob counter-clockwise for safety reasons.

And you’re done! You’ve just installed a new CB09 blade into the blade holder.
How to set CB09 blade depth
Position: Null
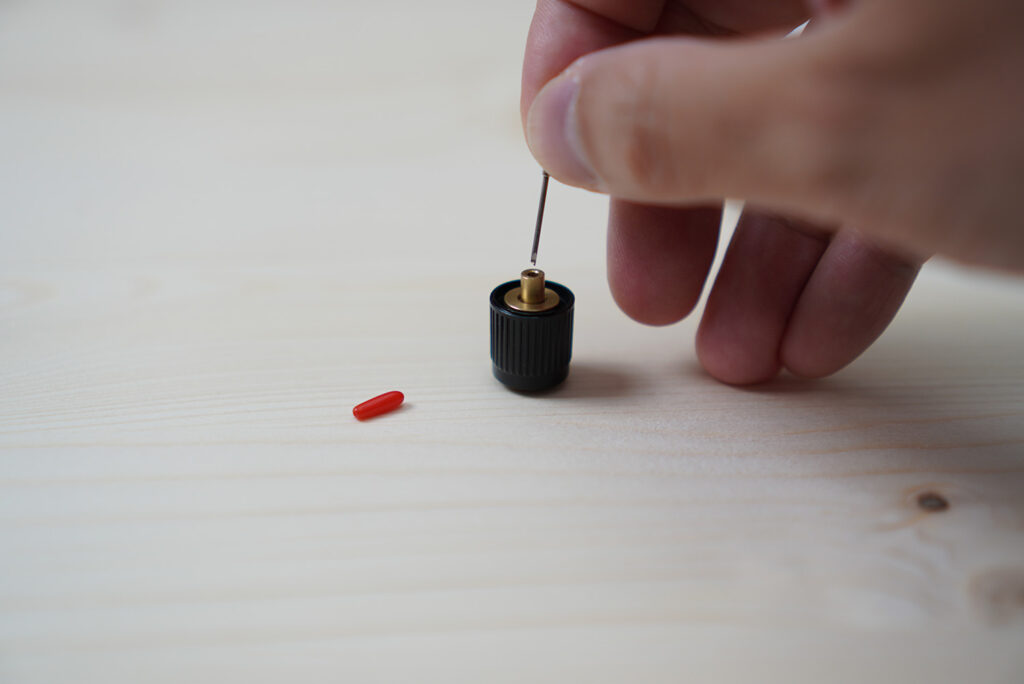
I like to set my blade depth to zero first. What I like to do is turn the knob so that I could see just the very tip of the blade. Put the blade down onto a piece of paper. With light pressure, try to draw some little lines or circles. You will feel the blade scratching the paper.


Now you want to screw the blade in ever so slightly by turning the knob just a tiny fraction at a time. Repeat until you don’t feel it scratching the paper anymore. Now we can safely assume that the very tip of the blade is completely flush with the outermost surface of the base. Let’s say that this is the zero position of the blade, or blade depth: 0.
To set the blade depth to 1, 2, and so on, we would need some sort of indicator. Luckily, there are so many blade depth indicator templates out there that you can get.
If you want mine, you can download it for free by clicking the button down below.
It is a .studio3 file so you would need Silhouette Studio to be able to open the file. You may adjust the size, font style and the color of the blade depth indicator to whatever you like.
Open the file in Silhouette Studio and print it on a piece of paper. Now cut it and stick it to the barrel of the holder with glue. If you’re feeling fancy, you can print it on a sticker paper and kiss-cut it with your machine.

It doesn’t really matter where you place the label. More importantly, we want to put a mark on the knob somehow that’s indicating the Null position.
You can stick a piece of vinyl on the knob directly above 0.

Or you can just use a sharpie to draw a line. Now if you want to set the blade depth to e.g., 5, then turn the knob until 5 is in line with the marking on the knob. It’s as easy as that!


Blue Adapter
To install the blade holder into your machine, if you have a Cameo 4, place it into the blue adapter. The blue adapter is included in the box when you the buy the machine, so you don’t need to buy a new adapter.
Do you notice that there’s a groove on the adapter? The ring on the blade holder will fit right in that groove. You want to place the blade holder like so:

Close the adapter to secure it and you are ready to install it into your machine.
There’s a chance that your blade holder won’t fit in the adapter. If that’s the case, just return the holder and get a new one. So it’s best to test if your blade holder fits in your adapter right away after you received it.
Conclusion
So to sum it up, here are the Pros and Cons of CB09 blades:
Pros
- Cheaper
- Cleaner cuts
Cons
- Blade depth needs to be adjusted manually
- No blade depth indicator
- Might not fit in the Cameo 4 blue adapter
- May void the warranty of your machine
CB09 blades are perfect for those, who:
- cut a lot of paper or cardstock and want a cheaper alternative to replace the blades
- want to avoid plastic waste

